IdeaSpark MS:Creative Project
Contents
Session 7 - Question, Understand, and Ideate
Introduction
- Congratulate students on their quiz apps. Let them know we're entering the final phase of ideaSpark. Tell them "In this phase, you'll be coming up with the ideas, not us!"
-
Have students think of some mobile apps they know of that solve a problem.
- "Most apps are made to solve some problem. Who can tell name that solves a problem?"
- When they call out the name of an app, ask them identify what problem it solves.
- If you get blank stares, it's ok to help with suggestions (for example, a calendar app solves the problem of remembering appointments and events in your schedule)
- The goal is to help them learn how to identify problems in the world. Also explain that problems aren't things to avoid - problems are just puzzles we have to figure out.
- "We're going to guide you through the process of understanding a problem, and how to come up with ideas for a prototype solution."
Choose a topic
- You're going to work with a partner to make an app that solves s problem. But first, you have to pick a problem to work on.
- Discussion: See if any students can identify some other problems from their own experiences. Suggest the following to get them going: #IdentifyingProblems
-
What are some problems in your everyday life that affect you, maybe something you find irritating or annoying? Walk through a typical day in your life. What do problems do you encounter while:
- getting up in the morning
- getting ready for school
- going from class-to-class
- getting lunch
- participating in sports, music, clubs, etc
- talking to friends
- doing recreational activities, like playing games or sports
- helping your parents out with chores
- doing homework
- getting ready for bed
-
What are some problems that you've noticed other people like friends or family struggle with that you might not have?
- People with disabilities (vision, hearing, etc.)
- The elderly
-
What are some problems that affect your community (school, neighborhood, city, etc)?
- Online Bullying
- Hunger & Poverty
- Littering and pollution
- Water conservation
- Energy conservation
Give students some time to talk through it and choose a topic. Once everyone has a topic, you're ready to move on to the next section.
Ask questions / Understand the problem
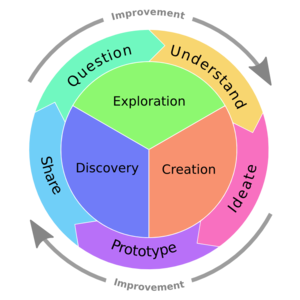
Show the project development process diagram. Explain that in order to have a prototype, we have to have some good ideas. But before we go around and start coming up with ideas, we need to make sure we really understand the problem we're trying to solve. The best way to do that is to ask questions.
|
|
TO-DO: Simple overview of QFT |
|
|
TO-DO: QFT Example |
Have each pair of students run through Question Formulation Technique
Ideate possible solutions (brainstorming / wireframing)
Brainstorming : Write the "Rules for Brainstorming" on the board:
- Go for quantity (generate lots of ideas)
- Don’t judge, don't criticize. There are no bad ideas!
- Build on the ideas of others.
- Encourage wild ideas.
- No ideas from adults - kids only!
Wireframing : Use pencil and paper to sketch out ideas for your app. Draw the different screens, buttons, menus, etc. Make notes on the page about different user interactions. See if you can think of multiple ways to go about it. Remember what you have available to work with in App Lab. Use the App Lab Layout reference for an overview of the App Lab interface elements.
Begin prototyping!
Have students work in pairs to begin prototyping, and continue to reinforce pair programming. Use Power Tools as needed.
Session 8
- Continue (or begin) prototyping
- Share your prototype idea (even if you only have sketches so far), get feedback
Session 9
- Look through the feedback from previous planning sessions
- Learn how to plan your project (see below)
- Continue prototyping
Project Planning
By now, students should have a good understanding of what they want to make for their apps. Today, students will learn how to break their project down into smaller, more manageable pieces.
Have each mentor work with students to break down their project into requirements written on a sheet of paper. Requirements are basically the features of your app. These should be specific enough that the students will know exactly what to do when working on that item. You can look back at the Quiz App project requirements for examples.
For each requirement, have students rate its effort on a "four-star" scale:
| ★ | tiny: can do within a few minutes |
| ★★ | small: can do in around 15-20 minutes |
| ★★★ | medium: can do in under an hour |
| ★★★★ | large: might take a whole session |
Anything larger than four stars should be broken down into smaller pieces.
Once you have a list of tasks, work with students to prioritize the requirements on a new sheet of paper. For example, if a task involves choosing a background image or something "cosmetic", that can be left until the end. For each requirement, you can ask the question "Is this essential in order to demo my app?".
During each session, you can use this list of requirements to keep students focused and on-task.
Session 10
- Continue prototyping
- Share progress, get feedback
Session 11
- Review and understand feedback
- Update project plan
- Continue prototyping
Session 12
- Review progress, how to prioritize and stay on track
- Continue prototyping
- Prepare for Demo Day
Session 13
- Prepare for Demo Day
- Continue prototyping if needed
Session 14
- Reflect
- Something fun?
