Intro Project (Age 7-10 Teams)
Contents
Learning Objectives
Students can:
- Break a task down into step-by-step instructions (i.e., an algorithm )
- Explore the code behind any website using the browser's developer tools and see the result of changing HTML and CSS code
- Use Pencil Code to construct a basic HTML web document that includes headings, paragraphs, lists, and links to other websites
Intro
Take about 10 or 15 minutes to have everyone on the team introduce themselves. Have them state their name and pick 1 to 3 fun questions to ask them (e.g., favorite food, favorite movie).
Ice-breaker
Begin the session with the PB&J Robot activity .
What to Expect / Ground Rules
Introduce the power tools that you want the team to use:
(Rubber-duck debugging may be better to introduce as the need arises)
Talk about these power tools early on so that they become part of the team culture. They may also become part of your ground rules for the team to follow.
Use a white board or note pad to brainstorm rules and expectations that the team wants to follow as a group. These are rules and expectations about how they want to treat each other and how they want their sessions to go. Create a poster that will be available at each session for the team to refer back to. The important thing with this activity is that the students take ownership of the way their sessions work. Mentors may have to guide the students to come up with a good list by giving them topics to think about, but make sure that the students are coming up with the final list.
Do Team Expectations Chart Activity
Websites: Behind the Curtain
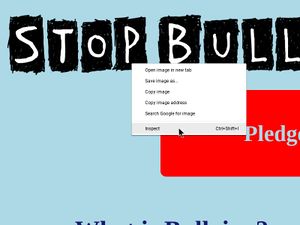
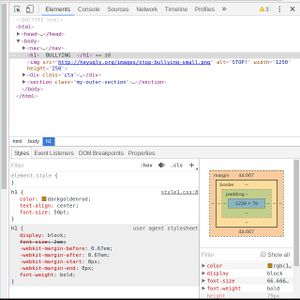
In this activity, students explore a live website behind the scenes. Mentors show students how to use "inspect element" to see how the website was made. The code may look intimidating, but encourage students to change the code and see what happens. Encourage students to use " Give-Me-Fives " to share their discoveries with the class.
Have students choose one of the following websites about social issues (these were made by our Geek 4 Good 2015 participants):
| Stop Bullying | https://www.boldidea.org/static/g4g/2015/g4g-team-1/ |
| Endangered Species | https://www.boldidea.org/static/g4g/2015/g4g-team-2/ |
| Saving the Forest | https://www.boldidea.org/static/g4g/2015/g4g-team-3/ |
| Safely Surfing | https://www.boldidea.org/static/g4g/2015/g4g-team-4/ |
| Feed the World | https://www.boldidea.org/static/g4g/2015/g4g-team-5/ |
| Fitness Fanatics | https://www.boldidea.org/static/g4g/2015/g4g-team-6/ |
Show students how to use "inspect element" to explore the source code of these pages. You can right-click anywhere on the page to bring up the developer tools pane. If needed, you can adjust the width of the developer tools pane by dragging the left side of the pane.
Encourage students to try and change content on the page (like the heading or a paragraph) or the style of the page (like font colors, background colors, font sizes, borders, etc.).
As students explore, a mentor should tell students about " Give Me Five ." Have them practice this by sharing what they discovered (they have to say "Give Me Five," not just raise their hand).
You can suggest students try the following:
- Click the "▶" icon at the left of any line in the HTML to expand and reveal more code inside that element.
- Watch what happens on the left as you move your mouse over the code. What do you think this is showing you?
-
Change the main heading of the page by double-clicking inside the
<h1>. -
Double-click on the
<h1>tag and change it to<h2>. What about<h2>? - Single-click on any tag to view the styles for that element
- Try changing the styles for that element. In the Styles tab, find a "color" property and try changing the color.
- Explore and see what else you can change!
HTML Boxes (unplugged activity)
Team: 4-5 students
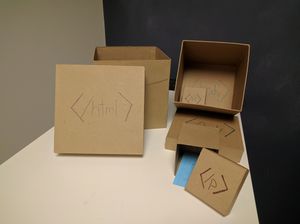
Divide students into groups of four to five and give each group a set of the HTML boxes along with a printout of the HTML Elements Box Challenge . Have students follow the instructions on the page.
Practice Activity: About my Partner
Team: 2 students
Start by introducing the students to Pair Programming (i.e., when two students share one computing device to write a program together). Pair Programming has two roles: 1) the driver who controls the mouse and keyboard and 2) the navigator who makes suggestions, points out errors, and asks questions. Watch the Code.org Pair Programming video together as a team. Then, ask the students to share what each role does and some dos and don'ts. They'll get practice applying pair programming for the rest of the semester.
Help students divide into pairs and hand out the About My Partner HTML Activity worksheet to each student. They will then take turns interviewing their partner with the questions on the worksheet so they can fill in the blanks.
Introducing Pencil Code
Next, introduce students to Pencil Code. Instructions for getting started in Pencil Code are in the Student Guide . Accounts will be created for each student ahead of time and usernames and passwords will be provided.
Once students are logged in, have them follow instructions in their guide under the Getting Started section for creating a new web page. The first step is to rename the file so that it puts Pencil Code into HTML mode (instead of the default turtle mode). Have students use their partner's first name for the name as the file name by clicking on the current file name at the top left-hand side of the screen (when you hover over it, it says "Edit to move or rename"). For example, if their name is "Jennifer," name the file "jennifer.html".
Their task is to construct an HTML page about their partner using the worksheet as a guide. All HTML pages should start with the
<html>
block. Have students drag that block into the workspace first. This will create multiple elements, including the
<body>
element which is nested inside the
<html>
element.
Next, look at the elements used on the worksheet and drag out the matching elements in pencil code (you'll have to check the different categories, such as "Sections," "Grouping," and "Content". Make sure to drag them inside the
<body>
element or else they might not show up on the screen. Students can press the "play" or "reload" button at any time to show the result of their code on the screen. During the activity, you'll need to prompt the pairs will switch driver and navigator roles. The driver, in this case will work on their webpage about their partner, while the navigator provides guidance in Pencil Code. They'll then trade roles.
Adding text inside the
<p>
element
To type inside a container element such as a
<p>
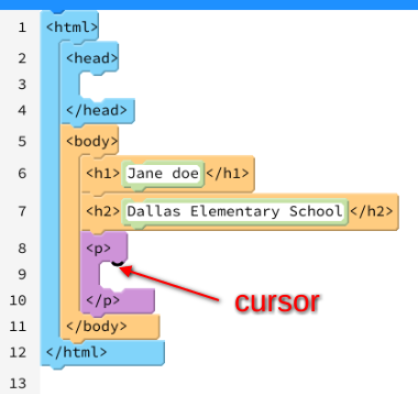
(paragraph), click the block and make sure you can see the blinking cursor inside the block (see below). Once you see the cursor, press the
Enter
key to create a text block inside the element. You can then start typing your text inside the new block.
If students are curious about what certain tags mean, for example, "what is the head tag?," they can refer to the HTML reference in their guidebooks.
Afterward, have each student present their pages to the class using a projector or TV (or they can turn their computers around and show everyone). Have students read the webpage about their partner.
Project: A Successful School Year
Team: 2 students
In this project, student pairs build a webpage together on what it takes to have a successful school year. Assign each pair one of the following topics:
- Study habits
- Healthy lunches
- Bully prevention
- Not getting sick
Students spend 15 minutes discussing the topics with their partners. They're welcome to take notes on scratch paper. At a minimum, their page must have the following HTML content:
-
One heading (
<h1>) -
At least 2 short paragraphs (
<p>) -
One or more lists (
<ul>,<ol>,<li>) -
One or more images (
<img src="/img/...">)
-
Pencil Code has a special feature that allows you to type any word as an image and it will automatically search for the closest match using Google Safe Search. Just use
/img/keywordfor the src attribute where "keyword" is the word to search for. For example, if you want an image of a backpack, use:<img src="/img/backpack">
Students may also use their guidebook to investigate other tags.
When they're done, the pairs can take turns showing off their page to the rest of the team. Encourage them to give positive feedback to the presenters on what they liked and helpful suggestions.


