Intro Activities
Contents
Overview
In this first project, students learn about the scope and procedures of the ideaSpark Web Development course, then learn basic HTML tags like
<h1>
and
<p>
to create two simple webpages with a partner. You and your student team will complete the activities on this page in the first two ideaSpark sessions.
You have plenty of flexibility to decide how much to focus on each day and to proceed at the pace of your students. For example your first two sessions may look like this:
- Session 1: Icebreaker game and review expectations, websites: behind the curtain, HTML box challenge, interview my partner, review Cloud 9
- Session 2: Review HTML tags and Cloud 9, start or edit 'About My Partner' webpage, create a 'How-To' webpage, try some extra challenges
Volunteer Focus
- Create a welcoming and inclusive environment.
- Build a positive relationship with ideaSpark students.
- Ensure that students have a positive first experience with Cloud 9.
Materials
- "HTML" Boxes (1 per team)
- HTML Elements Box Challenge (2 copies per team).
- About My Partner worksheet (1 copy per student).
- HTML Challenge Cards (4 challenge printouts, 1 set per team)
Learning Objectives
Students can:
- Explore the code behind any website using the browser's developer tools and understand the result of changing HTML and CSS code
-
Use HTML tags such as
<h1>,<h2>,<p>,<ul>, and<li> - Create a new workspace in Cloud9 and create new HTML files
- Know when it's appropriate to use certain tags
- Nest HTML tags with correct placement of opening and closing tags
- Create a basic HTML document using a text editor and see the results
Welcome to ideaSpark!
- Greet students at the door as they arrive. Invite them to sit down in front of a laptop. (There should be one laptop in front of every two chairs).
- Introduce yourselves. For example: "Hi, I'm Joey, and I'm a web designer at the Design Studio. I learned to code when I was your age. In my free time I enjoy playing soccer.
- Introduce the course. For example: "This semester, we'll be creating our own websites, while learning some web development languages - HTML to create content, CSS to style our page and Javascript to make it interactive."
- Invite students to introduce themselves, something interesting about themselves and their background in coding, if any.
Introduction to Power Tools and Expectations
Introduce the power tools that you want the team to use:
(Rubber-duck debugging may be better to introduce as the need arises)
Talk about these power tools early on so that they become part of the team culture. They may also become part of your ground rules for the team to follow.
Use a white board or note pad to brainstorm rules and expectations that the team wants to follow as a group. These are rules and expectations about how they want to treat each other and how they want their sessions to go. Create a poster that will be available at each session for the team to refer back to. The important thing with this activity is that the students take ownership of the way their sessions work. Mentors may have to guide the students to come up with a good list by giving them topics to think about, but make sure that the students are coming up with the final list.
Ice-breaker
Begin the session with an icebreaker activity .
Websites: Behind the Curtain
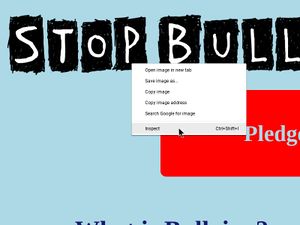
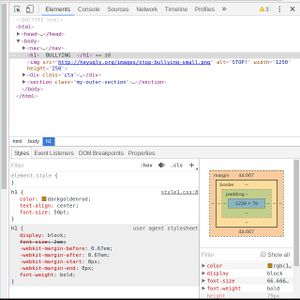
In this activity, students explore a live website behind the scenes. Mentors show students how to use "inspect element" to see how the website was made. The code may look intimidating, but encourage students to change the code and see what happens. Encourage students to use " Give-Me-Fives " to share their discoveries with the class.
Have students choose one of the following websites about social issues (these were made by our Geek 4 Good 2015 participants):
| Stop Bullying | https://www.boldidea.org/static/g4g/2015/g4g-team-1/ |
| Endangered Species | https://www.boldidea.org/static/g4g/2015/g4g-team-2/ |
| Saving the Forest | https://www.boldidea.org/static/g4g/2015/g4g-team-3/ |
| Safely Surfing | https://www.boldidea.org/static/g4g/2015/g4g-team-4/ |
| Feed the World | https://www.boldidea.org/static/g4g/2015/g4g-team-5/ |
| Fitness Fanatics | https://www.boldidea.org/static/g4g/2015/g4g-team-6/ |
Show students how to use "inspect element" to explore the source code of these pages. You can right-click anywhere on the page to bring up the developer tools pane. If needed, you can adjust the width of the developer tools pane by dragging the left side of the pane.
Encourage students to try and change content on the page (like the heading or a paragraph) or the style of the page (like font colors, background colors, font sizes, borders, etc.). You can suggest the following:
- Click the "▶" icon at the left of any line in the HTML to expand and reveal more code inside that element.
- Watch what happens on the left as you move your mouse over the code. What do you think this is showing you?
-
Change the main heading of the page by double-clicking inside the
<h1>. -
Double-click on the
<h1>tag and change it to<h2>. What about<h2>? - Single-click on any tag to view the styles for that element
- Try changing the styles for that element. In the Styles tab, find a "color" property and try changing the color.
- Explore and see what else you can change!
As students explore, a mentor should tell students about " Give Me Five ." Have them practice this by sharing what they discovered (they have to say "Give Me Five," not just raise their hand).
HTML Boxes (unplugged activity)
Materials required:
- HTML Boxes
- HTML Elements Box Challenge handouts
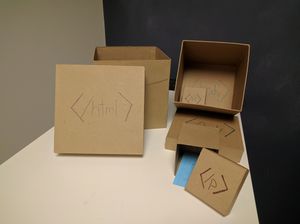
"HTML Boxes" are a real-world analogy used to demonstrate the nesting of HTML elements, and how elements have opening and closing. An open box represents the opening tag of an HTML element, while its lid represents the closing tag. Note how some boxes do not require closing tags (as in HTML5) such as
<img>
and
<video>
.
Depending on how many HTML Box sets you have, divide the students into equal-sized groups for each box. Give each group a set of the HTML boxes along with a printout of the HTML Elements Box Challenge . Have students follow the instructions on the page.
Practice Activity: About my Partner
Team: 2 students
Pair Programming
Start by introducing the students to Pair Programming (i.e., when two students share one computing device to write a program together). Pair Programming has two roles: 1) the driver who controls the mouse and keyboard and 2) the navigator who makes suggestions, points out errors, and asks questions. Watch the Code.org Pair Programming video together as a team. Then, ask the students to share what each role does and some dos and don'ts. They'll get practice applying pair programming for the rest of the semester.
"About my Partner" Worksheet
Help students divide into pairs and hand out the About My Partner worksheet to each student. They will then take turns interviewing their partner with the questions on the worksheet so they can fill in the blanks.
Let's explore Cloud9
Once students have finished their worksheets, their next task will be to use that worksheet to create their first HTML page using Cloud9. Cloud9 is an IDE , which stands for "Integrated Development Environment". You can think of it as a toolshed: A carpenter needs a place to work with all the tools they need such as wood, nails, hammers, and saws. In the same way, developers also need a place with all the tools required to build a website. That's what an IDE does for us. It's an environment that integrates a lot of developer tools.
Before creating our new HTML pages, we'll spend a few minutes learning how to create a new workspace, and become familiar with some parts of the IDE we'll be using the most.
Creating a new workspace
The student acting as the driver in their pair should now log into their Cloud9 account. Their usernames and passwords are printed on the inside of their student folder.
- Go to http://c9.io and click the sign-in button
- Once signed in, click "Create a new workspace"
- Make sure your team is selected in "Team" dropdown
- Make sure "Public" and "HTML5" are selected (these are usually the defaults)
- Click Create Workspace
- Once your workspace is created, you can feel free to close the bottom pane (the command line/terminal). We won't be using that in this course.
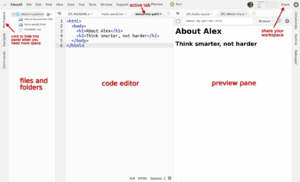
An overview of your workspace
Files and Folders
On the left-hand side of your workspace, you'll find your file tree . The main folder has been created for you, along with some example files. In the same way that you use your student folder to organize any papers we give you, you can use this folder to organize all the files you create for your website.
When you double-click a file, it opens up on the right-hand side in a new
tab
. You'll see that Cloud9 has already opened the
README.md
file for us. You can ignore that file for now. Whenever we open new files, they'll appear as a new tab in that area.
If you need more space to code, you can temporarily close (collapse) this panel by clicking the "workspace" button to the left.
Live Preview
See that file called
hello-world.html
? That's an example file that Cloud9 creates for us whenever we create a new workspace. Let's try opening it and see how it works.
- Double-click on the hello-world.html file (on the left) to open it. Don't worry about all the scary code, you'll be learning all about that later!
- Click the "Preview" button at the top of the workspace, then on "Live Preview".
The IDE will now open a new split-pane view, with your code on the left and a live preview of your web page on the right.
Important : Live Preview only works on whichever file you have selected in your code editor. So make sure you place your cursor in your code (click somewhere inside) before clicking Live Preview .
Sharing your workspace
Students working together should always give access to their partner's account, regardless of who's logged in. They should also add at least one mentor (it's also possible that a mentor could create workspaces for the students, and grant access to the students).
To give access to another person, simply click the Share button at the top-right. In the box that pops up, enter their username/email in the Invite People box. You'll also need to make sure "RW" is colored blue -- this means the person you're inviting can also edit your workspace.
It's important to grant your partner access to your workspace in case your partner needs to access it and you're not available.
Creating new files
Now, let's create a new HTML page and fill it out with the information we wrote on our "About my Partner" worksheets.
To create a new file, simply click on File -> New File (or press Alt+N).
Important
: Before you start coding, you need to save your file as an HTML file, so that the computer knows what type of file you'll be working on. Click on
File
->
Save
, and enter a name for your file. Don't use any spaces in your filename, and
be sure to end it with: ".html"
. For example,
my-partner.html
. Anything after the
.
in a filename is called the
extension
. In the future you'll create other types of files with different extensions, such as
.css
and
.js
. For now, just make sure your file name ends with
.html
.
Create your "about my partner" page in HTML
If you haven't already, go ahead and create a new file for your "about my partner" webpage. Before we start adding info from our worksheets, there are some HTML elements we need to add first.
HTML and BODY elements
Script for mentors:
-
Remember the HTML boxes? Which was tag was the biggest box that everything went inside? (students should respond with
<html>). - Let's go ahead and add that code to our page. Students should type the opening and closing tags for the html element in their newly created page. It's best when you put the opening and closing tags on separate lines, so that you can easily put more elements between the tags.
-
What was the next box that went inside that? (The answer is
<body>). Let's put that inside the<html>element. -
There's also one more bit of code we should add on the first line. It's a special tag unlike any other called "doctype", and it tells the web browser that we're using the latest and greatest version of HTML. The line of code looks like
<!doctype html>.
At this point, your code should look like this:
<!doctype html>
<html>
  <body>

  </body>
</html>
Add the other elements
Looking back at your "About my partner" worksheets, add the HTML elements inside the body element.
Only add the parts inside HTML tags
(not the questions in bold). For example, once you've added your
<h1>
element, your code should look like this (assuming your partner's name is "Alex"):
<!doctype html>
<html>
  <body>
    <h1>Alex</h1>
  </body>
</html>
Continue adding the rest of the elements, taking care to nest all your elements correctly. A final page might look like this:
<!doctype html>
<html>
  <body>
    <h1>Alex</h1>
    <h2>Everything is awesome</h2>
    <p>
      I like to play games, go on hikes, and by night I fight crime dressed in a cape and mask.
    </p>
    <ul>
      <li>Gravity Falls</li>
      <li>Steven Universe</li>
      <li>My Little Pony</li>
      <li>Harvey Beaks</li>
      <li>Regular Show</li>
      <li>Batman</li>
    </ul>
  </body>
</html>
A note on indenting your code
In the example above, notice how the lines are indented? It's done that way to make it easier to see which elements are
inside
other elements. You can see that the
<li>
elements are indented 2 more spaces than the opening
<ul>
tag. That's because they're
inside
the
<ul>
element. It's highly recommended that you indent your code in this way as much as possible. That will make things much easier for you as your pages fill up with more and more HTML code!
What did we just do?
As a group, talk about the elements they've added to their pages. Call out the following element names and see if anyone can guess the purpose of each tag name (tip: you can use NOSTUESO to make sure everyone has a chance to participate):
-
html
: This element is the "root" or "top-level" element. All other elements go inside this, and nothing goes outside of it (except for the special
<!doctype>element). -
body
: This is similar to the
<html>element in that we put all our page content inside it. But as we'll learn later, there are some "hidden" elements that we can put outside of the body. -
h1
and
h2
: The
"h"
stands for
"heading"
. Did you notice the difference between
<h1>and<h2>? One appears to be bigger than the other, but it's not just about font size:-
<h1>is used as the main heading on your page (you usually only neeed one of these per page). -
<h2>is used for subheadings. You can use these to give headings to different sections on your page. -
Bonus question:
<h1>and<h2>give us two levels of section headings. What element do you think we'd use if we needed a third level? What about a fourth level? (answer:<h3>,<h4>, etc...)
-
-
p
: the
"p"
stands for
"paragraph"
. When you write text in a word processor, all you have to do is hit the enter key to make a new blank line and a new paragraph. But in HTML, we use the
<p>element to contain each paragraph. Any time you want to start a new paragraph, you'll need to put it in a new<p>element. -
ul
: This stands for
"unordered list"
.
-
In addition to
<ul>, we can also use<ol>. -
Bonus question: Any guesses as to what
<ol>means? Try changing your<ul>and</ul>tags to<ol>...</ol>. (answer: ol stands for "ordered list". The browser will automatically number each item for you.)
-
In addition to
-
li
: This stands for
"list item"
. When you want to make a list of things, put each item between the
<li>tags. This element can only be used inside ul and ol elements.
Project: Write a "How-To" Page
Note: Now is a good time to switch pairs.
In this activity, students will create their own "how-to" page. A "how-to" page is simply a step-by-step instructional page on how to do some kind of task.
Begin by having students spend 10 or so minutes discussing the topics with their partners and planning the content that should go on their page. Give the students scratch paper to take notes on.
Finding and uploading images
Next, have students find 2 or 3 images on the internet that they can put on their how-to page. They can use Google's image search tool (Note: safe search is enabled by default, but please monitor their search terms). They'll need to find the URL to the high-resolution version of the image. Sometimes this involves clicking until they find the bigger version. Once they do, they can download the image to their computers.
To upload images to Cloud9, click File -> Upload local file . Click Select files and locate the image file you downloaded. Once you've done this, you should see the file appear in your file tree on the left.
Introducing the
<img>
element
Introduce your students to the
<img>
element
Tip : show the students this wiki section on a projector, laptop, or mobile device
The
<img>
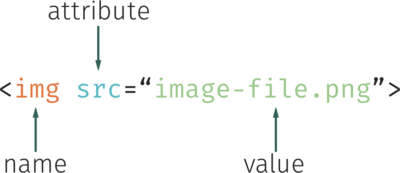
element is a bit different from the other elements you've been using. It has an
attribute
called "src" that tells the browser where to find the image so that it can display it on the page. It looks like this:
So, let's say you've uploaded an image called "cute-puppy.jpg" into your main folder. Your HTML code would look like this:
<img src="cute-puppy.jpg">
The
<img>
element is a special type of element that doesn't need a closing tag (as you saw during the HTML boxes activity).
Sometimes you might need to make the image a bit smaller or bigger. You can change the width of the image in pixels using the "width" attribute. For example, let's say you only want your image to be 400 pixels wide, you'd use this:
<img src="cute-puppy.jpg" width="400px">
This will scale the image proportionally so that the height is still correct and the image is not distorted.
Page requirements
At a minimum, their page must have the following HTML content:
-
One heading (
<h1>) -
At least 2 short paragraphs (
<p>) -
One or more lists (
<ul>,<ol>,<li>) -
One or more images (
<img src="/images/example.jpg">)
Students may also explore the full list of html elements for more ideas.
When they're done, the pairs can take turns showing off their page to the rest of the team. Encourage them to give positive feedback to the presenters on what they liked and helpful suggestions.
Additional Challenges
If students are breezing through their activities, you can have them try some of the HTML Challenge Cards .
