IdeaSpark ES:Guided Project Session 5
Session 5 will introduce CSS as a way to "spice up" their website.
If you didn't have time for sharing during session 4, be sure to do this now .
Contents
Intro
See what CSS can do! Have all students go to http://www.csszengarden.com/1/ . Explain that this looks much like the sites they've been developing. Pretty boring-looking, right? Have students right-click on the page and select "View Source" to see what the HTML code looks like. Have students call out any elements that they recognize.
Next, have students go to http://www.csszengarden.com/100/ (just change the 1 to a 100). Tell them that they've loaded the exact same HTML, but the only difference is that it now has a stylesheet. Explain that stylesheets aren't written using HTML code. They're written with another language called CSS. CSS is what gives our web pages a visual style, and you can do a LOT with it. Try changing the number in the URL to 101, 102, etc to view the pages with different stylesheets. Ask the students what changes, and what stays the same.
Try it out
Have students open the webpages they've been working on.
If you don't have a
<head>
element before the
<body>
element (inside the
<html>
element), add that now. Next, add a
<style>
element enside your
<head>
element.
At this point, we're going to start using text mode to write our CSS. Switch to to text mode now. We're going to style your
h1
element so that it's orange. To do this, we need to write a "selector" to select an element, followed by some style declarations.
Important: remember that all CSS code will go inside your <style> element.
To select an element, we just use its tag name. Type the selector, followed by two braces, like so:
h1 {
}
Now, you can type any number of style declarations between those braces to style the h1 element. A style declaration has a property and a value. For example, to change the color to orange, we use the property
color
and the value
orange
. The code looks like this:
h1 {
  color: orange;
}
Note: It helps to indent our style rules with 2 spaces to make it easier to read, but it's not required.
Your heading should now turn orange. Next, see what happens when you change the
h1
selector to
p
. All your paragraphs should turn orange. Why do you think this happened? (the answer is that you changed the selector, so it's now selecting a different element on the page).
Go ahead and change the selector back to
h1
. Next, we're going to make our heading centered. To do this, we use the
text-align
property and set it to
center
:
h1 {
  color: orange;
  text-align: center;
}
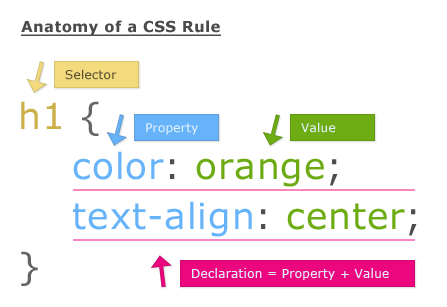
Congratulations! You've made your first CSS rule. The following diagram shows all the parts of a CSS rule:
Explore
Hand out the CSS Cheat Sheet to each student (they can keep this in their folders). This cheat sheet will serve as a quick reference for them to style their pages throughout the semester.
Spend some time to allow students to explore CSS and try some different things with their websites. Be sure to encourage students to share with the group as they discover new things (see: Give Me Five ).
Spice it Up!
As time allows, you can also hand out our Spice it Up cards for more ideas on ways to style their pages.
