Game Development 1 - Session 2
Contents
- 1 Learning Objectives
- 2 Preparations Before Class
- 3 Lesson Overview
- 4 Exit Ticket Answer Guide
Learning Objectives
- Re-use values in variables that are assigned elsewhere in the code
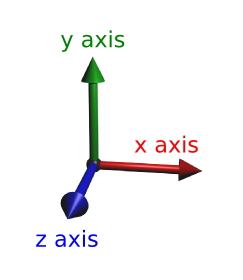
- Identify the X, Y, and Z axis of a 3D-plane
- Keep one object attached to another when changing the other object's position or rotation
Preparations Before Class
- Choose a mentor (preferably the SME) to lead Explaining Variables .
- Write out "Old Macdonald" on a whiteboard as shown in Explaining Variables .
Lesson Overview
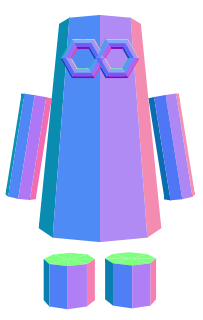
This week we will be creating some shapes to make our very own avatars! Chapter 3 will guide us through how to make one from head to toe and we will learn about objects and methods along the way. Students are able to create their avatar with any shapes they like as long as it had a head, body, arms, and legs.
Icebreaker [5-10 minutes]
Do an icebreaker activity, or just chit-chat with the students (ask them about their week, if anything interesting happened, etc).
Explaining Variables [10-15 minutes]
Have the chosen SME lead the the class in Explaining Variables . Afterward, talk about how we're going to use variables while making avatars.
- We're going to use variables when creating our game avatars.
- We're going to build our avatar using different shapes, but each shape is going to have the same material (or cover).
- That means we can use a variable to define the cover once, and then use that variable when creating our final mesh.
Create a simple avatar [20-30 minutes]
- Have students start with Chapter 3, Making an Avatar .
- Review the pair programming rules, and remember to switch driver/navigator from time-to-time.
- Remember that we're using Cloud9 instead of ICE, so students will create a new workspace in Cloud9 called "my-avatar" (no spaces) by cloning the starter project. They can refer to the Cloud9 handout for a reminder on how to do this.
Applying variables
Section 3.2, Making a Whole from Parts", explains how we used a variable to save us quite a bit of typing:
Notice that we didn’t create a new cover for the hand. Instead we reused the same cover, which we named cover when we used it for the avatar’s body. That saves us a bit of typing.
Break [5-10 minutes]
Customize Your Avatar [20-30 minutes]
Allow students to customize their avatars using what they learned in the last session. You may need to do a quick review of all the different shapes they have available.
Students can go back and refer to Chapter 1, Creating Simple Shapes to see how to create different shapes.
To give students some ideas, show them our examples of different avatars below.
|
|
There's a good chance students will create bugs during this step. Refer to chapter 2 on debugging using the console, and use your SME as a last resort. |
|
|
TIP: You can go to https://threejs.org/docs/ , and find the different geometries available in THREE.js. Clicking on a geometry will allow you to play with the different parameters and give some ideas on what to add to your avatar |
Doing Cartwheels [15-20 minutes]
Make sure to leave enough time for the "doing cartwheels" activity. Students will create the animate function first, but it won't rotate the entire avatar.
This section of the book will walk them through changing their code so that all objects are grouped together and attached to the
avatar
object. That way, if we rotate
avatar
, everything else rotates with it.
Explaining Rotation
When you want to rotate an object, how do you know whether to change the x , y , or z axis?
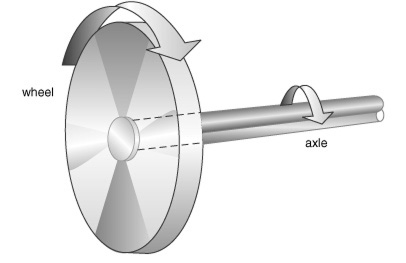
A good way to explain this is to think of each axis (X, Y, or Z) as an axle around which a wheel can rotate.
So, to make your avatar do cartwheels, you rotate around the z axis . To do "flips" (so that it rotates toward/away from you) you rotate it around the x axis .
Exit Ticket [5 minutes]
Have students complete their Exit Tickets .
Extra Time
If there's extra time, students can try making the avatar flip in addition to cartwheeling (see page 34). They can also continue customizing their avatar.
Exit Ticket Answer Guide
1. What is the purpose of a variable in coding? (check all that apply)
☑ It is a named placeholder for a value
☐ It tells you when you have an error in your code
☑ It saves you from having to type extra code because you can reuse values
☐ It makes all parts of your avatar rotate as one piece
2. How would you set the position of an object so that it's more to the
left
?
☐ Increase the y value
☑ Decrease the x value
☐ Increase the x value
☐ Decrease the z value
3. How would you change the position of an object to move it
forward
or
backward
?
☐ Change the x value
☐ Change the y value
☑ Change the z value
☐ Change the rotation value
4. We used the following code to create our avatar's hand:
var right_hand = new THREE.Mesh(hand, cover);
right_hand.position.set(-150, 0, 0);
scene.add(right_hand);
But when we rotate our avatar, the hand doesn't rotate with it. How do we fix it so that the hand is "attached" to the avatar?
☐ Change right_hand.position to left_hand.position
☐ Change scene.add(right_hand) to scene.add(avatar)
☑ Change scene.add(right_hand) to avatar.add(right_hand)
5. How would you make an avatar "flip" (so that it's rotating toward you, not doing cartwheels)
☑ Change its x rotation
☐ Change its y rotation
☐ Change its z rotation


