Game Development 1 - Enhancements
Contents
Small performance tweaks
Fix the scrolling issue (remove screen padding)
We did this in session 5, but some students might not have done this in their code yet
You might notice when you press a key to move your avatar, the window pane scrolls just a bit. To fix this, add some CSS code by changing the first line (
<body></body>
) to:
<body><style>html, body {padding: 0; margin: 0}</style></body>
Better Graphics (switch to WebGLRenderer)
We did this in session 5, but some students might not have done this in their code yet
By default, our projects are using the
CanvasRenderer
. Since most modern laptops support WebGL, let's switch to using the WebGL renderer. This will make everything run a bit more smoothly from now on.
Find the line that looks like:
var renderer = new THREE.CanvasRenderer();
And change it to:
var renderer = new THREE.WebGLRenderer();
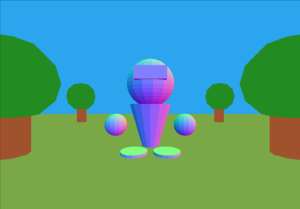
Add a ground to stand on
Note: This requires that you're using the WebGLRenderer as shown above
You can use
PlaneGeometry
to add a flat ground for your avatar to walk on.
You can put your code anywhere in your project. Think of a place that makes sense so that you can easily find it later (for example, you could put it after your
makeTreeAt()
calls.
// Create a flat 2D plane shape that's 5,000 x 5,000 pixels
var groundShape = new THREE.PlaneGeometry(5000, 5000)

// Create a material for the ground and give it a green color
var groundMaterial = new THREE.MeshBasicMaterial({
  color: 0x7aa846
});

// Create the ground object (mesh) by combining the above shape and material
var ground = new THREE.Mesh(groundShape, groundMaterial);

// Set the position of the ground so that it's below the trees and avatar (you may need to adjust the position on the Y axis)
ground.position.y = -185;

// Rotate the ground -180° on the x axis so that it's laying flat. It's negative because PlaneGeometry is only visible on one side (this makes it more efficient).
ground.rotation.x = -(Math.PI / 2);

// Add the ground to the scene
scene.add(ground)
|
|
You don't have to type the comments, but it can be helpful to explain what's going on in your code. |
Add a blue sky
Note: This requires that you've fixed the padding issue as mentioned above
Once we've added green grass, we can simulate a blue sky pretty easily. All we have to do is set the web page background to blue.
At the very top of your code is a
<style>
HTML element inside the
<body>
element. We're going to add more CSS code, so it might help to re-format it so it's easier to read. Then, just add
background: #2AA5EE;
to give it a blue color (or you can use any color you like).
<body>
  <style>
    html, body {
      margin: 0;
      padding: 0;
      background: #2AA5EE;
    }
  </style>
</body>
Smoother controls
Try a demo of smoother controls here: https://boldidea.org/static/gamingjs/demo
Have you noticed how your avatar doesn't immediately respond to a key press? There's a bit of a delay between the time you press the key and when the avatar responds. To see why this is happening, place your cursor in your browser's address bar, and hold down the right or left arrow key to move the cursor. Notice how there's a delay before the cursor starts moving? That's how your avatar is moving. But instead of moving the cursor one space, the
keydown
event listener is fires and your avatar moves a few pixels.
To fix this, We need to make it so that movement is calculated every
frame
(ie, in our
animate()
function), instead of relying on keypress repetition.
We already have four variables that tell us whether or not the avatar is moving left, right, forward, or backward. These are set in your
keydown
event listener. Currently, when the
<--
key is pressed, you move the avatar a few pixels to the left, and set
is_moving_left = true;
. All you need to do is move the position-changing line up to your
walk()
function, which runs every
frame
(instead of the keypress repeater).
if (code == 37) {
  marker.position.x = marker.position.x-5;  // move this line to the walk() function
  is_moving_left = true;
}
We want the avatar move left if <ocde>is_moving_left</code> is true, so we need to add this to the conditions in our
walk()
function, like so:
// Add the following condition
if (is_moving_left) {
  marker.position.x = marker.position.x-5;  // cut-and-paste this line from where the keydown event listener
}
Do this for each of
is_moving_left
,
is_moving_right
,
is_moving_forward
, and
is_moving_back
.
Variable Speed
Is your avatar a bit sluggish? You can create a variable for speed to make it easier to experiment with different walking speeds. At the top of your code, create your speed variable and set it to 20:
var speed = 20;
Then anywhere in your code that changes the avatar's
x
or
z
position (for example,
avatar.position.x = avatar.position.x + 5
), you can put
speed
in place of the number:
avatar.position.x = avatar.position.x + speed;
Tip
: You can make that line even shorter by using the handy
+=
operator. This operator takes care of the addition and the assignment all at once:
avatar.position.x += speed;
Important:
Remember to use this variable anywhere you move the avatar. This includes your up, down, left, right movement code, but also in your
detectCollisions
function.
Make a randomized forest of 50 trees
You can see a demo of random trees here: https://boldidea.org/static/gamingjs/demo
Luckily, we have a function that creates trees for us. Instead of manually placing 4 trees, why not put
50
trees in random places? We can use the
Math.random()
function to generate a random number between 0 and 1, and then multiply that number so that it lies somewhere on our x/z axis. We can then use a
for loop
to make a tree at a random position 50 times.
The best place to put this code is just before the
animate()
function call.
Note: remember to remove your 4 makeTreeAt() lines first
// loop from 0 to 49 (50 times)
for (var i = 0; i < 50; i++) {
  // pick a random number for X and Z on the ground
  var x = (Math.random() * 5000) - 2500;
  var z = (Math.random() * 5000) - 2500;

  makeTreeAt(x, z);
}
Challenge: Sometimes a tree will appear on top of our avatar, and our avatar will get stuck inside it! See if you can find a way to prevent this from happening!
Shading & Lighting Materials
You've used two different materials in your game so far. You used
MeshNormalMaterial
for your avatar, which uses a range of colors (from blue to magenta) to help visualize the depth in your object. The other material you've used is
MeshBasicMaterial
, which allows you to give your object a flat color.
There are other materials in THREE.js you can experiment with, such as
MeshPhongMaterial
, which (when combined with a light source) will give your object a more shaded look.
You might have noticed that your trees don't have much depth to them. The tops just look like flat circles instead of spheres. The following example shows what your trees can look like if you use a different material and some ambient lighting: https://boldidea.org/static/gamingjs/demo
Example
In order to do this, we need to change the material our tree is made with to
MeshPhongMaterial
. And instead of using
color
to set the colors, we're going to use a property called
emissive
. So, for example, to make our tree trunk, it looks like this:
  var trunk = new THREE.Mesh(
    new THREE.CylinderGeometry(50, 50, 200),
    new THREE.MeshPhongMaterial({  // Change MeshBasicMaterial to MeshPhongMaterial
      emissive: 0xA0522D  // Change color to emissive
    })
  );
Next, we need to add a light source. A good place to add this code would be just before your
makeTreeAt(x, z)
function definition.
var light = new THREE.DirectionalLight();
light.intensity = .2;
light.position.set(-2500, 2500, 2500);
scene.add(light);
Textures
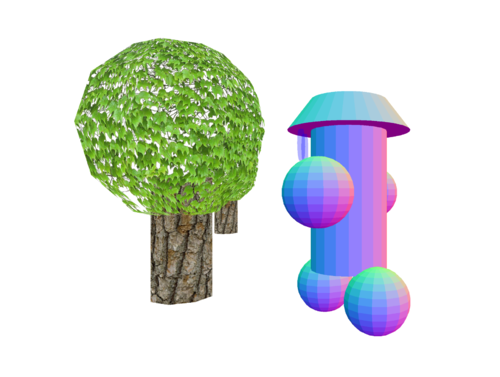
The materials you've been using so far only give you a solid color and some shading. Did you know you can use an image in place of a color? When you use images on your 3D objects, it's called a texture . The 3D system will "wrap" the image around your object as best as it can. You can change settings to repeat the image around the object as well.
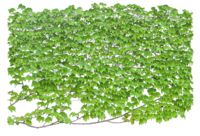
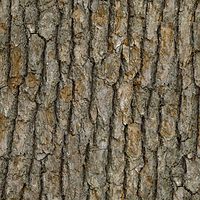
The example pictured above is using two different textures. One for leaves and another for the bark. The texture images actually look like this:
You can use transparent PNG files for a really cool effect. Just use
transparent: true
when creating the material.
Look for images designed to be used as textures (search for things like "UV texture map"). note that some textures are designed for very specific geometries and models, so stick with simple ones that work on cubes, spheres, cylinders, etc.
Example
var leaves = new THREE.ImageUtils.loadTexture('./textures/leaves.png');
leaves.wrapS = THREE.RepeatWrapping;
leaves.wrapT = THREE.RepeatWrapping;
leaves.repeat.set(2, 1);
var top = new THREE.Mesh(
  new THREE.SphereGeometry(150),
  new THREE.MeshBasicMaterial({
    map: leaves,
    transparent: true
  })
);
See the following links for more examples on texturing. Use Ctrl + U to view the source code.
Sky Box
Important: To use this enhancement you'll need to upload a newer version of Three.js (rev. 53) to your lib/ folder. You can download the following URL: https://raw.githubusercontent.com/mrdoob/three.js/r53/build/three.js
You can use textures to create a SkyBox . A SkyBox is a background image projected onto a cube surrounding your entire scene, which creates the illusion of distant 3D surroundings.
View the link below to learn how to do a skybox effect. Use Ctrl + U to view the source code.
This example uses six separate images. Check out this link for a large library of pre-sliced skybox textures: https://boldidea.org/static/gamingjs/skyboxes/
	var imagePrefix = "images/dawnmountain-";
	var directions  = ["xpos", "xneg", "ypos", "yneg", "zpos", "zneg"];
	var imageSuffix = ".png";
	var skyGeometry = new THREE.CubeGeometry( 5000, 5000, 5000 );

	var materialArray = [];
	for (var i = 0; i < 6; i++)
		materialArray.push( new THREE.MeshBasicMaterial({
			map: THREE.ImageUtils.loadTexture( imagePrefix + directions[i] + imageSuffix ),
			side: THREE.BackSide
		}));
	var skyMaterial = new THREE.MeshFaceMaterial( materialArray );
	var skyBox = new THREE.Mesh( skyGeometry, skyMaterial );
	scene.add( skyBox );
Making the skybox feel less like a box
As you move around inside your skybox, you might notice it still feels like you're inside a box w/ fancy wallpaper. The point of the skybox is to make it seem like it goes on forever, and that you'll never reach the edge. To achieve this effect, the skybox should move with the camera.
An easy way to do this is to attach it to your movement marker. Your avatar projects currently have this as the
marker
variable. To make this work, add the skybox to the
marker
instead of the scene. Change the
last
line of the code above to the following:
     // instead of adding the skybox to the scene, add it to the marker so that it stays in the same place at all times
     marker.add(skyBox);
3rd-person POV
Most "3rd-person shooter" games have a camera that follow's the character's back, and turns with the avatar so the player can always see the action ahead of them. To accomplish this same effect we have to change not only the direction the camera is facing, but also how we control our avatar.
Changing the camera
Changing the camera is the easy part. Find the place in your code that sets the camera's position.
- Change its Z position to -500 (instead of 500) so that it's behind the avatar.
-
Turn it around 180° by setting its Y rotation to
Math.PI.
camera.position.z = -500;  // change this line
camera.rotation.y = Math.PI;  //add this line
Next, we want the camera to always be at the avatar's back. Right now the camera is attached to the marker, which doesn't rotate with our avatar.
Now we want the camera to follow the avatar's rotation, so find the line of code that adds the camera to the marker , and change it so that it adds the camera to the avatar :
avatar.add(camera); // change this line
Changing the controls
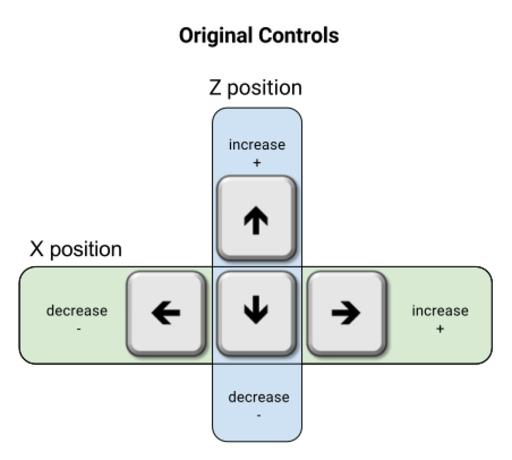
Once you change the camera to follow the avatar's back, you'll notice the controls seem clunky and unintuitive. Currently, the up and down arrow keys change your Z position , while your left and right keys change your X position :
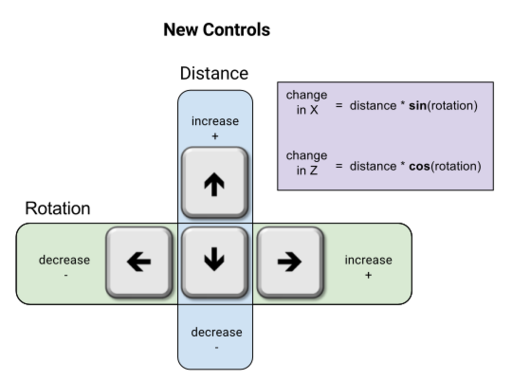
That means when you turn, it turns you 90° to the left or right, and your avatar moves in that direction. A better way to control your avatar would be to have the left and right keys to slightly change your avatar's rotation , and the up and down keys to move you forward in whatever direction you're facing. So, if you're facing 45° to the right, you'll move along a line that's angled 45° to forward and to the right.
First, we'll have to make it so that when we press left or right, the avatar simply turns a little to the left or right, but doesn't actually change its position. Then, the up and down keys will need to move the avatar along an angled line. We can use the
Math.sin
and
Math.cos
functions to calculate the new X and Z coordinates based on which direction we're facing.
First, let's change the
turn()
function so that it
only
turns the avatar, and it doesn't move it left or right:
function turn() {
    // start from where the avatar is currently facing
    var direction = avatar.rotation.y;

    // adjust the direction a little bit
    if (is_moving_left) {
      direction += .25;
    }
    if (is_moving_right) {
      direction -= .25;
    }

    if (isWalking()) {
      // turn the avatar to point in the new direction
      spinAvatar(direction);
    }
}
Then, change the
walk()
function so that we move the avatar back and forward along an angled line that we calculate using
Math.sin
and
Math.cos
:
function walk() {
	if (!isWalking()) return;

	// note: if you already have a speed variable set somewhere else, use that instead.
	var speed = 20;

	// calculate the change in x and z position based on the direction we're facing
	var dx = speed * Math.sin(avatar.rotation.y);
	var dz = speed * Math.cos(avatar.rotation.y);

	// if we're colliding with something, move in the opposite direction
	if (detectCollisions()) {
	  dx *= -1;
	  dz *= -1;
	}

	// move forward in a positive direction
	if (is_moving_forward) {
	  marker.position.x += dx;
	  marker.position.z += dz;
	}
	// move back in a negative direction
	if (is_moving_back) {
	  marker.position.x -= dx;
	  marker.position.z -= dz;
	}

	// This is the code we already had in here for animating the hands:
	var position = Math.sin(clock.getElapsedTime()*10) * 50;

	right_hand.position.z = position;
	left_hand.position.z = -position;
	right_foot.position.z = position;
	left_foot.position.z = -position;
}
Other examples
The following link has tons of examples on different things you can do with THREE.js. Just click on the example, and use Ctrl + U to view the source code.
Other Ideas
The following ideas require a bit more thought and problem-solving, but the results are worth it!
Open-world
You could make your game an open-world game by automatically generating your landscape. You could write a function for generating ground and trees at a certain position. Then, when your avatar gets near enough the edge of the world, you could call that function to automatically add more space.
Boxed-in world
You can also make your game "boxed-in" so that the avatar moves through limited space such as a haunted house or a dungeon. You would need to create walls, a ground, and a ceiling, and use collision detection to make sure your avatar doesn't walk through those walls.
